Friday, December 17, 2010

Just in time

Left early today to avoid any train carnage. Luckily tonight the last working stop seems to be Oxford. This is the usually quiet concourse that greeted me.
Thank fuck it's Christmas now and I don't have to do this anymore for three weeks.

Sunday, November 28, 2010

[How To] Compiling VLC in XCode for iPad simulator and device

[EDIT Feb 2012]:
It has been a pretty long time since I put this post together and a lot has changed in VLC, FFMPEG and iOS since then. Whilst I hope that there is still useful information here I am not sure that this guide should be considered up to date and correct anymore. Maybe one day I can find time to update it but I am just too busy with other projects for it to be top of my list.
Do keep leaving comments if you have corrections or new info and I will try and add them in.


[NOTE]:
Sorry but I am not able to distribute pre-built binaries for any part of this app so please don't waste time asking me to send you a compiled version, it probably wouldn't work anyways (code signing etc.)

I have been messing with the VLC iOS source recently to see if I could hack it up to work with the new airplay protocols for Apple TV. Sadly any airplay hook up is not going to be straight forward as the VLC player is not using a MPMoviePlayerController instance or subclass to display the movie. It's not clear yet if I can hijack the video stream from the custom view and pipe it over the hard way but I will keep hacking in spare moments.

[UPDATE]:
Now that VLC has been pulled from the AppStore I am expecting that there will be many more people interested in compiling VLC themselves. I will hopefully find some time soon to do some more hacking on VLC myself soon and will update this guide if I find bits of the process change.

Actually getting the source to compile was a bit of a mission and looking at the videolan forums there are a few others out there struggling to compile the sources too so here is how I managed it. There are quite a few steps so I have split it up into the three main tasks.

Build the Aggregate libraries.
  1. Install git if you don't have it already. You will need this to grab the latest source and for the build script to complete.
  2. Open up a terminal window and cd to the directory you want to download and build in.
  3. clone the MobileVLC.git repo.
     git clone git://git.videolan.org/MobileVLC.git  
    
  4. Open up buildMobileVLC.sh in your favourite editor.
  5. I had a problem with the build script failing trying to remove symbolic links that didn't exist. I fixed this by editing line 121 to wrap a remove in a conditional.
    From:
     rm External/MobileVLCKit  
    
    To:
     if [ -e External/MobileVLCKit ]; then  
     rm External/MobileVLCKit  
     fi  
    
  6. If you have XCode setup to use a custom build location (for instance if you use a shared location to leverage project includes in your other projects) then the easiest way to get this working is to go to preferences and set the option back to the default (Place build products in project directory). If you don't do this then you will need to edit the buildMobileVLC.sh lines 117 and 118 so that the products can be found.
  7. In theory the buildMobileVLC.sh script should take a flag to set the SDK you want to use. However in practice I found that it didn't so edited all occurences of 3.2 to be 4.2.
  8. At the time of writing a recent commit causes the AggregateStaticPlugins.sh script phase of MobileVLCKit to fail.  Check that ImportedSources/vlc/projects/macosx/framework/MobileVLCKit/AggregateStaticPlugins.sh does not have plugins+="access/access_mmap ". If it does then just delete this line. ** This has been resolved in the latest revision.
  9. In terminal cd into the MobileVLC directory and execute buildMobileVLC.sh passing the -s flag for simulator, then run it again without the flag to build for device. This is just so that later you can switch between simulator and device in XCode without any problem.
  10. The script will take a little while to run, especially first time out as it needs to bring in 2 repos from git.videolan.org and compile a metric ass ton of dependant libraries. There are a shocking amount of warnings and errors reported by the build of the libraries, no wonder building this thing is so brittle. Once its finished you are looking to see the magic words "Build complete" and you should be OK. 
Configure XCode to get simulator working
  1. Next open up the MobileVLC.xcodeproj. We will get it running from here in the simulator first.
  2. Select the project root and open up the inspector (get info). On the General tab set the "Base SDK for all configurations" to be the SDK you are using (in this case it was 4.2).
  3. Close the inspector and toggle the target select dropdown to debug then back to release so that the "missing base SDK" warning disappears.
  4. Now you can set the target hardware to Simulator and the active executable to iPad (although this guide should work for iPhone too).
  5. You can if you like hit build and run but the VLC app will crash as soon as it launches. This is because there is a bad path to the MediaLibrary data model for core data.
    Expand the External/MediaLibraryKit group and select the MediaLibrary.xcdatamodel (it should be highlighted red showing there is a problem) and open inspector.
  6. Hit choose to find the correct the path. Project relative it is ImportedSources/MediaLibraryKit/MediaLibrary.xcdatamodel.
  7. Finally you should be able to hit build and run and see the VLC app open up in the simulator.
Configure XCode to get it on a device
  1. I am going to assume you already have a developer certificate and an application agnostic Team Provisioning Profile. If not then this next bit is of no use to you anyway.
  2. Select the MobileVLC target and open the inspector. 
  3. On the build tab set the code signing entity to use your developer identity.
  4. Change the target to device in the target select dropdown, plug in your iPad and build and run.
  5. If the build fails at this point with something like:
     file was built for unsupported file format which is not the architecture being linked (armv7)  
     Undefined symbols:  
      "_OBJC_CLASS_$_VLCMediaPlayer", referenced from:  
        objc-class-ref-to-VLCMediaPlayer in MVLCMovieViewController.o  
      "_OBJC_CLASS_$_VLCMedia", referenced from:  
        objc-class-ref-to-VLCMedia in MVLCMovieViewController.o  
      "_OBJC_CLASS_$_VLCTime", referenced from:  
        objc-class-ref-to-VLCTime in MVLCMovieGridViewCell.o  
      "_OBJC_CLASS_$_MLMediaLibrary", referenced from:  
        objc-class-ref-to-MLMediaLibrary in MobileVLCAppDelegate.o  
      "_OBJC_CLASS_$_MLFile", referenced from:  
        objc-class-ref-to-MLFile in MVLCMovieListViewController.o  
        l_OBJC_$_CATEGORY_MLFile_$_HD in MLFile+HD.o  
     ld: symbol(s) not found  
     collect2: ld returned 1 exit status  
    
    Then go back to terminal and run buildMobileVLC.sh again with no flags.
  6. You should now be seeing the VLC app running on the iPad.

Friday, November 19, 2010

Graffiti on office wall

Problem with @dynamic property declarations for core data managed objects

I have just had the most frustrating debug session I can remember due, I believe, to the (recommended by Apple) use of the @dynamic declaration for NSManagedObject properties.

I have an object that is defined like this:

 @interface SomeObject : NSManagedObject {  
 }  
 @property (nonatomic, retain) NSNumber * isRead;  
 @end  
 ...  
 @implementation SomeObject  
 @Dynamic isRead;  
 ...  
 @end  

Apple tells us to use the @Dynamic declaration instead of @synthesize as a speed optimisation. What this means however is that the return type of isRead can not be relied upon to be an NSNumber, nor can it be relied upon to be the same every time!

In this particular situation the core data was being refreshed from a JSON web service if the device had an internet connection or read from disk if it was offline. The behaviour of the application depends upon the YES/NO value of isRead.

As an aside here the reason that isRead is NSNumber rather than BOOL is because when the data is read in from the JSON service it is converted to an NSDictionary and the true/false string of the web service ends up coming out as NSNumber 1/0 because only objects can be added to a dictionary and BOOL is a primitive.

SO...
when offline

2010-11-19 15:27:21.732 MyApp[1086:207] SomeObject isRead is 0
2010-11-19 15:27:21.742 MyApp[1086:207] SomeObject isRead is of type _PFCachedNumber

when Online

2010-11-19 15:30:41.415 MyApp[1111:207] SomeObject isRead is 0
2010-11-19 15:30:41.424 MyApp[1111:207] SomeObject isRead is of type NSCFBoolean

This caused a monstrous bug because we were trying to compare an NSNumber like this

 if(SomeObject.isRead == [NSNumber numberWithBool:NO]){  
  //do stuff  
 }  

Which would work if the device was online but not if there was no network. try tracking that one down! To fix it I had to reverse the polarity on the test.

 if(![SomeObject.isRead boolValue]){  
  //do stuff  
 }  

Which in all honesty is probably a better way of writing the test.

Bitmasks, how the fuck do they work?

This was an actual question I was asked when I suggested "Use a bitmask" as a solution to a messy option list problem.

The Scenario:
The web service (or whatever) you are communicating with has a load of options that can be toggled on and off for a particular resource/operation/whatever. The somewhat basic design comes back as specifying in the JSON (I'm going to stop adding the whatever now mmkay) that you set these like so...

 {  
  "thing" : {  
    "option1" : "true",  
    "option2" : "false",  
    "option3: : "true",  
 ....  
  }  
 }  

Which looks fine enough except that when there is a lot of these options its both a pain setting them up before you send and its not really that efficient data transmission wise.

Instead think about using a bitmask. First there is the spec. (This is using C/C++/Obj C)

 typedef enum {  
  Option1 = 0,  
  Option2 = 1 << 0,  
  Option3 = 1 << 1,  
  Option4 = 1 << 2  
 } OptionTypes  

If you are using some other language you could have a hash/dictionary/associative array etc. where we are increasing the count in base 2 such as...

 OptionTypes = {  
  "Option1" = 1,  
  "Option2" = 2,  
  "Option3" = 4,
  "Option4" = 8,  
 ...  
 }  

Then to define the set of options in use you just use a BITWISE OR and test for options in use with a BITWISE AND.

 // set  
 myOptionSet = (Option1 | Option2 | Option4);  

 // test  
 if(myOptionSet & Option1) doOptionOneThing;  
 if(myOptionSet & Option2) doOptionTwoThing;  
 ...  

Which can be sent to the web service with a single integer value.

 // assuming 1,2 and 4
 {  
  "thing" : {  
    "options" : 11,  
 ....  
  }  
 }  

Simples.

Up at the crack of dawn

Monday, November 15, 2010

System restore "disk" for MacBook Air

Sunday, November 14, 2010

First Apple TV app - Hello World

What else was it going to be? I still don't have a clue what the published headers all do but at least I can get something to compile.

Wednesday, November 10, 2010

Getting the Apple TV 2g into DFU for jailbreak

I've been having some fun the last couple of nights poking around inside the new Apple TV. Out of the box it doesn't really appeal to me at all, I am just not interested in having a locked in iTunes rental box. Once jailbroken though with access to all that lovely iOS framework underneath there are definitely a few uses I can find for a £100 HD N class wifi media streamer with a palm sized form factor.

Anyways I had a whole heap of trouble actually getting the bastard thing broken in the first place because no matter what I tried I just couldn't get it into DFU (Device Firmware Upgrade) mode to flash the modified firmware onto it. I tried using the Pwnage tool with just the USB plugged in as all the tutorials suggest, I tried the manual reboot method (holding menu+down then menu+play) but nothing worked.

From all the trawling on the internets trying to work out what was going on I saw that I was not the only one having trouble. In the end I didn't find the method that worked for me online so am posting this in case it helps any other poor sods out there in the same spot.

  1. Chances are that in trying to get it into DFU and failing the device is in restore mode. Plug the ATV into the TV and power and if the screen is showing the "connect to iTunes" graphic then it's in restore mode. If so then get it back into a fresh state and connect to your computer using only the USB cable and let iTunes restore it.
    - Note that this is still when the only official FW out is the original 4.1 so doing a restore and update is no big deal. You did of course save your SHSH blobs before you started all this right?
  2. Now that your ATV is back to factory settings unplug the USB and plug the power back in. No need to connect it to the TV. Fire up the Pwnage tool (I am assuming here that you have already built the custom .ipsw file but if not now is a good time to do so) select the ATV device and hit the DFU button.
  3. With the power cable plugged into the ATV now plug the USB into the computer as directed by the Pwnage tool.
  4. Pwnage tool now tells you to disconnect the power. Do as it says. 
  5. When instructed hold down the menu and play buttons together for 7 seconds and release when instructed.
  6. Hold your breath. (not sure this is mandatory but it worked for me).
  7. Now you should be in DFU and can go ahead with the option-restore in iTunes to load your custom firmware.

I think the key step here is the initial connection with the power cable attached. Unplugging the power cable lets the device reboot at just the right time for the timed DFU steps in the Pwnage tool to work "just so".

Once you have the new firmware installed plug the ATV back into the TV and power and go configure it for your network. It will not look any different to normal at this point. Once you have a network connection you can ssh into the box as root (default password "alpine" change it as soon as you are in) and get to the hacking proper.
Good luck to you, hope this helps.

Wednesday, November 03, 2010

Automating build versioning in XCode for iOS with SVN and Dropbox

I am working on an iOS project at the minute that is heavily dependant on a test team actually getting the latest version of the app onto a variety of devices and tapping away to verify the latest feature*. At certain times in the sprint as defects come in are fixed quickly and a new version put out it was becoming very difficult to keep track of the builds and who had what.

To make matters worse the way a tester would get a new build was for them to walk up to a developer and ask for the latest stable version. The developer would then need to stop what he was doing, grab the relevant version from svn, plug the test device into their machine and hit build. This was horrible for workflow and productivity.

This week sees the first real run with my automagical build system and so far its working great. Basically it uses the "build and archive" function to share an installable build to a dedicated build station running iTunes. All the devices are synced to this version of iTunes and the binary gets to the machine by a network folder - we happen to use Dropbox for this.

This works OK but there are a couple of gotchas. In order for iTunes to recognise the incoming build as an update the version number must have changed. This meant that the developers needed to keep the minor version number rolling along and we resorted to naming the binary with a number including the SVN revision and the date and time. I didn't like this much so came up with a better way of numbering the versions.

Modifying a script I found here I added a bit that pulls the last subversion revision from svnversion (including the Modified flag if appropriate) and creates a build version number like M.M.M.svn.m for example. 2.0.1.1923M.3 is the third build from a modified SVN revision 1923 of release 2.0.1.

Here's the script:

 #!/bin/bash  
 PROJECTMAIN=$(pwd)  
 PROJECT_NAME=$(basename "${PROJECTMAIN}")  
 echo -e "starting build number script for ${PROJECTMAIN}"  
   
 # find the plist file  
 if [ -f "${PROJECTMAIN}/Resources/${PROJECT_NAME}-Info.plist" ]  
 then  
   buildPlist="${PROJECTMAIN}/Resources/${PROJECT_NAME}-Info.plist"  
 elif [ -f "${PROJECTMAIN}/resources/${PROJECT_NAME}-Info.plist" ]  
 then  
   buildPlist="${PROJECTMAIN}/resources/${PROJECT_NAME}-Info.plist"  
 elif [ -f "${PROJECTMAIN}/${PROJECT_NAME}-Info.plist" ]  
 then  
   buildPlist="${PROJECTMAIN}/${PROJECT_NAME}-Info.plist"  
 else  
   echo -e "Can't find the plist: ${PROJECT_NAME}-Info.plist"  
   exit 1  
 fi  
   
 # try and get the build version from the plist  
 buildVersion=$(/usr/libexec/PlistBuddy -c "Print CFBundleVersion" "${buildPlist}" 2>/dev/null)  
 if [ "${buildVersion}" = "" ]  
 then  
   echo -e "\"${buildPlist}\" does not contain key: \"CFBundleVersion\""  
   exit 1  
 fi  
   
 echo -e "current version number == ${buildVersion}"  
   
 # get the subversion revision  
 svnVersion=$(svnversion . | perl -p -e "s/([\d]*:)([\d+[M|S]*).*/\$2/")  
 echo -e "svn version = ${svnVersion}"  
   
 # construct a new build number  
 IFS='.'  
 set $buildVersion   
 MAJOR_VERSION="${1}.${2}.${3}"  
 MINOR_VERSION="${5}"  
   
 if [ ${4} != ${svnVersion} ]  
 then  
 buildNumber=0  
 else  
 buildNumber=$(($MINOR_VERSION + 1))  
 fi  
   
 buildNewVersion="${MAJOR_VERSION}.${svnVersion}.${buildNumber}"  
 echo -e "new version number: ${buildNewVersion}"  
   
 # write it back to the plist  
 /usr/libexec/PlistBuddy -c "Set :CFBundleVersion ${buildNewVersion}" "${buildPlist}"  

Just place it in your project directory and tell XCode to run it as a the first phase of the build by adding a new "Run Script" build phase. Then getInfo on the new phase and set shell: /bin/bash and script: ./path/to/script

Now when the build and archive runs I can grab the build version from the results window and add it to the resolve comment in Jira so the tester knows which build to grab from the dropbox. All they need to do is go to the build station, click the build in the dock stack (hooray for stacks and instant context opens) which will replace the version in the iTunes library with that build. Then they just plug in the device and it updates.

Next step will be to subscribe all the devices to a twitter feed using some iOS client that does push notifications on @mentions so that I can tell a device to get a new build from the station.

    Tea made by robot. (kind of)

    I have a new robot friend.


    Hey little buddy lemme look in your belly, yummy camomile flowers.


    Nooo! what are you doing? halp!

    slurp!

    Wednesday, October 27, 2010

    iPhone Dev Tip - Blocks are great, er.. kind of.

    I found myself confronted by this rather vague and unexpected error today when dropping a new build onto a test device.

    dyld: Symbol not found: __NSConcreteStackBlock

    Vague because the symbol didn't reference any library that I was expecting to have been added and unexpected because the build was working on the other dev and test devices.

    The only difference was the test device was running iOS 3.1 rather than the 4.x variants of the others, which was in fact the root of the problem.

    In an animation block I had used the nice new method
    [UIView transitionWithView:duration:options:animations:completion] 
    Which takes a set of animation operations as a block, which is an iOS4 only feature. Thought it worth leaving a reminder as the usual stack overflow/google trawl didn't throw me any bones.

    Sunday, October 17, 2010

    Freya Gets Milk

    Sunday, September 19, 2010

    Freya Plus UZU

    Friday, September 17, 2010

    iPhone Dev Tip: Watching for 404's

    Something I have seen a few times when debugging iPhone apps for clients is a misunderstanding of the definition of "Success" when it comes to the NSURLConnection class. In the NSURLConnection delegate  protocol a "successful'" connection is any one that makes a connection to the target host and gets an ACK. This means that when using these methods to get HTTP content (such as JSON and XML, a common pattern) any 404 or 500 errors returned by the target host are treated as a success if not handled correctly.

    The way to fix this is to cast the NSURLResponse object to an NSHTTPURLResponse in the didReceiveResponse delegate method. For example set up a connection in the standard way.

     // url for download  
     NSURL *url = [NSURL URLWithString:[self urlString]];  
     // request  
     NSURLRequest *request = [NSURLRequest requestWithURL:url cachePolicy:NSURLRequestUseProtocolCachePolicy timeoutInterval:30;  
     // connect  
     NSURLConnection *connection = [[NSURLConnection alloc] initWithRequest:request delegate:self];  
    

    Then in your NSURLConnection didReceiveResponse method.

     - (void)connection:(NSURLConnection *)connection didReceiveResponse:(NSURLResponse *)response {  
          // cast the response to NSHTTPURLResponse so we can look for 404 etc  
          NSHTTPURLResponse *httpResponse = (NSHTTPURLResponse *)response;  
          if ([httpResponse statusCode] >= 400) {  
               NSLog(@"remote URL returned error %d %@: ",[httpResponse statusCode],[NSHTTPURLResponse localizedStringForStatusCode:[httpResponse statusCode]]);  
               .....  
          } else {  
               // start recieving data  
             ...  
          }       
     }  
    

    Monday, September 13, 2010

    Rick Has Mostly Been Listening to...


    Thursday, August 12, 2010

    Baby Bear

    Wednesday, August 11, 2010

    Compiling CyberLink UPNP for iOS redux

    A while back I posted some - admittedly vague - instructions on how to compile the CyberLink UPNP library into a static .lib suitable for use in an iPhone project. The method turned out difficult (if not impossible) to reproduce because a) it had been quite a while since I worked through the steps myself and b) because the files included in the distribution of the CyberLink library had changed subtly so my method wouldn't work any more.

    The key to getting the library to compile in the way that I managed it is a set of Objective C wrapper classes that sit between the standard c distribution and your iPhone cocoa project. These wrapper classes were included in the distribution as examples in the first few releases but are missing from later versions. At the time of writing the CyberGarage website is down so I have not been able to check the current status.

    As a result I have had several requests to share my Xcode project so that others can also get the UPNP library compiled. I have been a little reticent to do so because although the library was released as an opensource project on sourceforge it is possible that the author Satoshi Konno changed his mind about including the wrappers after he no doubt used them in some commercial products. I sent a couple of emails over to Satoshi San asking if he minded if I share the code or if he could re-include the wrappers in a new release but have not had any response.

    So now I have decided to make available my Xcode project with the original wrappers included along with my tweaks to get it to compile for iOS "as is" until such time as I am asked to take it down by the author if he objects to it being available. I hope that it helps you get UPNP working in your projects, of course official UPNP support would be even better.

    You may want to update the c portions of this project from the latest sourceforge snapshot to take advantage of any bugfixes or improvements but note that this might break a couple of the wrappers where I have added my own functions to the c library. This will only be minor breakage however and easy to iron out.

    To compile and then include it in your project use a shared build location as described by the modular shared library scheme discussed in the Clint Harris tutorial. This is for sure the most important part to getting the library to link into your projects correctly. The problem is that to use the library it must be compiled for the exact configuration you are using it in. Emulator != Device and SDK versions can be significantly different. This means that you need to go back and tweak the build settings for the static library project, rebuild and then redo the link in the parent project each time you switch between emulator and device testing. A real pain. The modular linking method solves this by linking the entire static library project as a sub-project and rebuilding automagically where required. You will struggle to use the library unless you follow those steps. Go read it now, really.

    Back? OK now make sure that you have recursive header search paths

    [path to]/CyberLink/std/av/include 
    [path to]/CyberLink/include
    in the build settings for the CyberLink target as the paths are set explicitly in my project and probably get mangled when you use it.
    I have updated the project to use ${SOURCE_ROOT} as I should have done from the start.

    Make sure that the paths to the local libXML are correct too so that building the release and debug versions work as expected. You will need to update the path to use the SDK version you are building for. Or you could try using this technique to make an SDK agnostic link.

    When that's done just import the modules you need as so...

    #import <CyberLink/CGUpnpControlPoint.h>
    #import <CyberLink/CGUpnpAction.h>
    #import <CyberLink/CGUpnpDevice.h>
    #import <CyberLink/CGUpnpService.h>
    #import <CyberLink/CGUpnpStateVariable.h>


    Happy hacking!

    Original post
    Download Xcode project CyberLink.zip

    Monday, March 22, 2010

    Selecting the most apropriate toys for junior

     
    It is very important to set the expectations of the young realistically via play.

    Thursday, March 18, 2010

    iPhone Dev tip - (another) Note To Self

    The Quartz core animation methods are easy and simple to use but don't help you if you are are doofus. Setting up a CAKeyframeAnimation to act on the a property of a layer/view whatever will not warn you if that property does not exist.

    I just spent 2 hours trying to figure out why this didn't work...

    CAKeyframeAnimation *moveLeft = [CAKeyframeAnimation animationWithKeyPath:@"postion"];

    The answer was - there is no such property as POSTION.
    Doh! FacePalm! etc.

    Tuesday, March 09, 2010

    A trio of new tracks

    A little catch up for those that don't follow me absolutely everywhere I go on the internets (Hi Mum) two new tracks and a quick sketch.

    First out a track using a crappy guitar loop as the only sound source, crappy because both my guitar and my playing skills suck. Trust me you wouldn't want to listen to it unprocessed. I fed it into the Ableton Looper device and then dragged some of those loops kicking and squealing into the M4L Buffer Shuffler where it got cut up and mutilated in real time driven by some MIDI from the Tenori-On. The FX chain I am using for this is a bit of a favourite at the minute. It can make nice pad sounds out of pretty much any noise (as you will see in a bit) and the Resonator in the middle of the chain can retune it wherever I like.  I am going to have to be careful not to overuse it as it is just so so easy to throw a noise at it and say "I has made soundscape!"
    As If Nothing Happened by Dionysiac

    Next up a track I made as a remix of sorts for the Cloudcycle project. They provide some interesting and diverse sound sources as seed and have produced themselves a massive output of different styles. For my part I took a very short cut from some pad like sound and stretched it right out and ran it through some multiband rhythmic gating. Underneath it is a bit of one of their drum loops, and a lovely synth line that I reversed just for good measure. To top it off I added a long sample of air traffic control chatter around JFK airport.
    Cloudcycle - Stratus (JFK Approach) by Dionysiac

    Finally a quick sketch for the first in a series of pieces I want to do using recordings of cold war numbers stations. I have been a bit fascinated with these strange espionage artefacts for a while now and their resonance (both psychological and auditory) is really quite compelling. This is a recording of the New Star Broadcasting Station from the magnificent conet project. The only sound source is the station recording run into my favourite FX chain with the resonator tuning tweaked every 8 bars or so. I'm using the rhythmic gating again to give it movement and a bit of delayed and clean sample overlain back on top.
    Numbers - New Star Broadcasting by Dionysiac

    Wednesday, February 24, 2010

    Compiling CyberLink UPNP into iPhone SDK

    Recently I was asked about a post to a forum I made back in 2008 when I first started hacking around with UPNP applications on the iPhone. At the time I was working on an application to control my Sonos devices using my iPhone as remote. Although I was successful, shortly after I got my first stable prototype running the "official" version was released and was plenty good enough for what I wanted so I abandoned the project. I did not however abandon UPNP on the iPhone as it remains a large missing link in the iPhone SDK.

    UPNP is used by many connected home devices to notify other like minded devices of their presence, capability and services. Responding to UDP broadcasts a device and service description is made available in XML  for digestion by client programs. Most media servers and streamers speak UPNP along with some wireless photo frames.

    UPNP is missing along with all the other XML based web services provision in iPhone SDK for... er reasons best known to Apple I guess but there exists a well used and stable open source UPNP library for C, C++ and Obj-C that compiles into the iPhone SDK with a bit of hacking.

    CyberLink UPNP is an open source C framework for UPNP written and maintained by Satoshi Konno. The C source files and Objective C wrappers are available from the sourceforge project which you can get to from the CyberGarage site. However all the example code and the framework project are linked against the MacOSX Cocoa framework not the iPhone Foundation framework. This means that in order to compile it for use on iPhone you need to repackage the whole thing into a Cocoa Touch static library.

    It has been a while since I repackaged it for my needs so it would take me a deal of time to recreate a detailed step by step but the main tasks are:

    1. Locate and download all the source code from sourceforge.
    2. Create a new Cocoa Touch static library project.
    3. Copy all the source files into your new project.
    4. Get rid of all the #import cocoa cocoa.h lines and replace with #import foundation foundation.h (easiest to do this in the prefix headers)
    5. Change the use of imports to "CGUpnpDevice.h" for the classes used. Or create a UPnP.h combined header.
    6. Compile, track down and squash the errors, rinse repeat.
    The most elegant way to then use the static library in your projects is to use a shared build folder and implement the modular shared library scheme discussed in Clint Harris' excellent tutorial. Good luck and happy hacking!

    Sunday, February 14, 2010

    Multi-band Dynamic Gating

    I have a new compositional obsession at the moment, dynamic multi-band gating. It pretty much looks like this...

     
     With a rich timbre sound source input the source is split up into different frequency bands that are then gated using different patterns. Add on some FX to the chain for extra sauce and away we go. Making the patterns have different periods makes for some interesting cyclic interactions. I am working on a method to modulate the gate patterns in realtime as a way of playing live and improvising compositions.

    Here is a session I did this weekend with a prototype.

    Impulse (manifold) by Dionysiac

    Tuesday, February 09, 2010

    iPhone Dev tip - Note To Self

    This is pretty much a note to self but might help some other poor shmuck out there who fails to notice, as I did, a seemingly unimportant bit of a reference page.

    Here is the problem - You create and initialise a UIAlertView or UIActionSheet object and your application crashes with EXC_BAD_ACCESS. "How can this be?" you wonder, it's a brand new object, how the hell is it accessing bad memory?

    Well the error is misleading, in fact you have probably not read the reference page right. If you fail to terminate the otherButtonTitles parameter with a nil like this:

    UIAlertView *myAlertView = [[UIAlertView alloc] 
                               initWithTitle:@"some title" 
                                     message:@"a message"
                                    delegate:delegate 
                           cancelButtonTitle:@"cancel" 
                           otherButtonTitles:@"foo", nil]
    

    Then you get the EXC_BAD_ACCESS error, not, as you might reasonably expect an error telling you that the parameters were wrong.

    I lost a lot of hours learning that so you don't have to.

    Wednesday, February 03, 2010

    A Max4Live device control

    A little gift from my Live 8 studio control template. Control the parameters of the currently selected device on a track in Ableton Live 8.
    A Lemur module and max device. with eight knobs and labels that synchronises to the selected device without the need for MIDI mapping. It is designed to work on device racks so will have strange behaviour if pointed at a device preset that is not contained in a rack with macros.

    The patch relies on the CNMAT OSC Max objects. You need to get the "Everything for Mac" or "Everything for Windows" pack from here: http://cnmat.berkeley.edu/downloads and install that somewhere in your Max path.
    1. Download from the JazzMutant user area.
    2. Unpack and copy the "Live Device" subfolder to your Live library (I suggest under Max Audio Effect)
    3. Add the "Live Device Control" to your master track.
    4. Fill in the IP address and port for your Lemur's OSC setup.
    5. Load the module onto your Lemur.
    6. Select a device on any track and hit the green 'sync' button on the Lemur module.
    7. Play with the knobs!
    The interface will follow as you select different devices on the same track but will need synchronising again if you move to a different track (although it will continue to control the last selected device).

    Saturday, January 23, 2010

    The EsoWave Sequencer

    Introducing The EsoWave

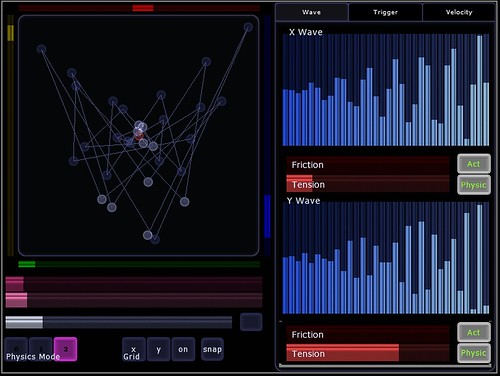
    The EsoWave sequencer is a project for the Jazzmutant Lemur. It is a esoteric/generative midi sequencer that sends midi notes according to the positions of 32 nodes in a 2D plane. The nodes are connected along an elastic string and can be additionally controlled by two waveforms that drive the X and Y coordinates.
    Available from the JazzMutant user area 

    UPDATE:
    Since the sad demise of JazzMutant it's good to know that the Lemur lives on in the form of an iOS app from Liine. EsoWave is one of the factory templates in the app and downloadable from the Liine community templates page.

    The EsoWave is given away for free under a creative commons license but if you like it and would like to make a contribution then you can send something to me on paypal.


    Some examples of it in action:
    An early prototype run with some ambient drone noises.


    Using the nodes to trigger beat clips in Live (poor sound quality)


    more ambient drone, just audio this time.
    x²+y² = a²[arc tan (y/x)]² where x=cos(2*pi*t) by Dionysiac

    Other people using it.


    The Scale Editor

    The nodes control midi out on four channels. Each channel has a scale that determines the note pitch and can be independent from the others.

    fig1 - Scale Editor
    Standard scale types can be selected or a custom scale created. Scale lengths between 5 and 9 notes are supported. The scale is defined as the root note followed by a number of semitone steps. The starting octave of the scale is also selected. Figure1 shows the wave editor and a C major scale. The root note of C is followed by semitone steps of 2,4,5,7,9,11 (or a pattern of W-W-H-W-W-W-[H] in standard notation).
    The 'make chromatic' button sets the scale to basic chromatic scale (all steps of 1 semitone).
    The scale can be copied to the other tracks using the buttons at the bottom.

    Node Note Assignment

    Each node in the string can be assigned a note from the scale to play when activated. The note assignment screen allows notes to be assigned to the nodes over two octaves from the root note of the scale.

    fig2 - Node Note Assignment Screen
    Each step is a note in the scale, step zero disables the note for that node. Using a seven note scale step 8 would be the same note as step 1 but an octave higher. The highlights show in real time the activation status of the nodes and also the triggering status of the nodes.

    Note Velocity

    The MIDI note velocity of the nodes is controlled from the Velocity Settings screen.

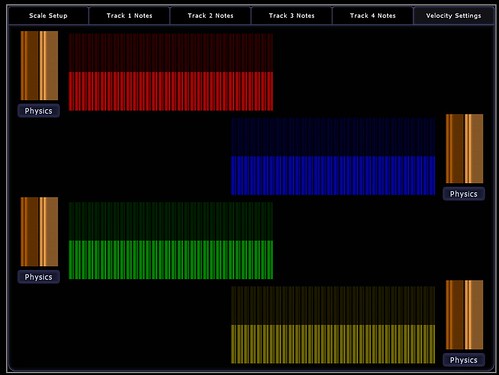
    fig3 - Velocity Settings Screen
    The note velocities for each channel can be assigned here or set to oscillate by switching on the physics for the velocity slider and adjusting the friction and tension sliders. Another view of the velocity sliders is available from the main control screen.

    The Wave Editor


    The Wave Editor screen allows for the creation of waveforms to drive the X and Y coordinates of the nodes. Many interesting complex shapes can be created through the combination of waves available. Each waveform 'buffer' is split into 32 steps, one for each node. The value of the step in the buffer determines the distance along the corresponding axis.

    fig4 - Wave Editor
    At the top of the screen are the two waveform buffers, X on the left, Y on the right. Between them are selectors for sine and cosine function when the wave is in SinCos mode. A ReSync button resets the incremental LFO for both waves to zero so that waves can be synchronised.

    Below each wave are physics settings for when the wave is in Manual mode and buttons to toggle the wave's control of the nodes and the wave movement. The friction slider adjusts the friction of the wave buffer and the tension slider adjusts the tension of the wave buffer string.

    To each side are buttons to select the different wave modes and sliders that adjust the wavelength and speed of the waves. The wavelength slider adjusts how many cycles appear in the buffer at any moment and the speed slider the rate of change. The wavelength and speed sliders have no effect in manual mode.

    Wave Modes:
    1. Manual
      In this mode a waveform can be drawn onto the wave buffer and set to oscillate by switching on the physic toggle.
    2. SinCos
      The wave buffer displays a sine or cosine waveform selected using the 'Sin Cos' toggle switch.
    3. Interlace
      The wave buffer displays an interlaced sine or cosine wave. Each alternate step of the wave is swapped with the corresponding value from the end of the buffer. For example step 2 swaps with step 15 and step 4 with step 13.
    4. Comb
      A simple comb wave with alternate values of 0 and 1.
    5. Spiral
      The buffer is filled with the spiral function - x²+y² = a²[arc tan (y/x)]²
    Main Control Screen

    This screen is the hub of the sequencer. From here you can adjust the range of the node activation areas, set which nodes are triggered, adjust manual waveforms, adjust note velocities and 'play' the node string directly.

    fig5 - Main Control, trigger page
    On the left of the screen is the node surface. Around the outside are the activation ranges for each of the tracks. Whenever a node is inside an activation range it is 'active' and able to trigger a noteon message, leaving an activation range will trigger a noteoff message.

    When the node string is not being controlled by a wave buffer the sliders below the node surface control the physics effects of the surface and string.
    First is a friction control, high values will make the nodes slow to a stop over time and low values will allow the nodes to move indefinitely.
    The next slider controls the speed of the node movement, a high friction and low speed will make the nodes feel sluggish when moving them manually.
    The third slider controls the rest distance between the nodes. Low values will attract the nodes to each other forming tight bundles. High values will make the nodes repel each other and move to the edge of the surface. The rest distance slider can be made to oscillate by pressing the toggle switch to the right.

    Below the sliders are two sets of buttons. The first on the left controls the physics mode of the node surface. The physics modes are:
    • no physics - nodes will remain where dragged
    • mass spring - nodes will move according to the physics settings but are not attracted to each other nor can they cross each others vertical plane.
    • super spring - nodes move according to physics and are attracted by an elastic string joining them.
    The next set of buttons apply grid settings:
    • hold x - no change of horizontal position possible
    • hold y - no change of vertical position possible
    • grid on - surface divided into a 32x32 grid. nodes will align to the nearest grid point.
    • 'snap' - nodes will distribute evenly along the X and Y axis (regardless of other grid settings)
    Trigger Settings
    The trigger grids shown in figure 5 determine if an active node can send a note (if assigned one). Each grid is an 8x4 array of squares, one for each node in the string. As the nodes move through the activation ranges the trigger grid for that node will light up. Selecting a grid square will highlight that square and play the note assigned to that node (if any) when it is activated. The grid squares will 'pulse' when a note is assigned to the node it represents.
    Wave and Velocity Views
    Also available from the main control screen are views of the wave buffers and the note velocity assignments. The wave buffers active and physic toggles can be controlled and the waveform edited if the wave buffer is in manual mode. The velocity levels can be changed and will be reflected on the main velocity control screen.


    Creative Commons License
    The EsoWave Sequencer by Rick Hawkins is licensed under a Creative Commons Attribution-Share Alike 3.0 Unported License.