Introducing The EsoWave
The EsoWave sequencer is a project for the Jazzmutant Lemur. It is a esoteric/generative midi sequencer that sends midi notes according to the positions of 32 nodes in a 2D plane. The nodes are connected along an elastic string and can be additionally controlled by two waveforms that drive the X and Y coordinates.
Available from the JazzMutant user area
UPDATE:
Since the sad demise of JazzMutant it's good to know that the Lemur lives on in the form of an iOS app from Liine. EsoWave is one of the factory templates in the app and downloadable from the Liine community templates page.
The EsoWave is given away for free under a creative commons license but if you like it and would like to make a contribution then you can send something to me on paypal.
An early prototype run with some ambient drone noises.
Using the nodes to trigger beat clips in Live (poor sound quality)
more ambient drone, just audio this time.
x²+y² = a²[arc tan (y/x)]² where x=cos(2*pi*t) by Dionysiac
Other people using it.
The Scale Editor
The nodes control midi out on four channels. Each channel has a scale that determines the note pitch and can be independent from the others.
 fig1 - Scale Editor
The 'make chromatic' button sets the scale to basic chromatic scale (all steps of 1 semitone).
The scale can be copied to the other tracks using the buttons at the bottom.
Node Note Assignment
Each node in the string can be assigned a note from the scale to play when activated. The note assignment screen allows notes to be assigned to the nodes over two octaves from the root note of the scale.
 fig2 - Node Note Assignment Screen
Note Velocity
The MIDI note velocity of the nodes is controlled from the Velocity Settings screen.
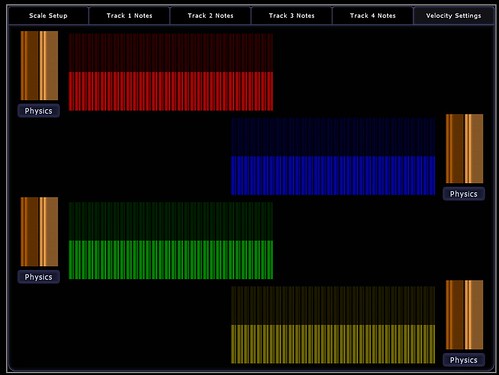 fig3 - Velocity Settings Screen
The Wave Editor
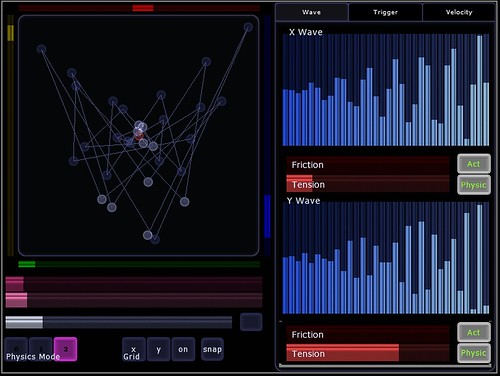
The Wave Editor screen allows for the creation of waveforms to drive the X and Y coordinates of the nodes. Many interesting complex shapes can be created through the combination of waves available. Each waveform 'buffer' is split into 32 steps, one for each node. The value of the step in the buffer determines the distance along the corresponding axis.
 fig4 - Wave Editor
Below each wave are physics settings for when the wave is in Manual mode and buttons to toggle the wave's control of the nodes and the wave movement. The friction slider adjusts the friction of the wave buffer and the tension slider adjusts the tension of the wave buffer string.
To each side are buttons to select the different wave modes and sliders that adjust the wavelength and speed of the waves. The wavelength slider adjusts how many cycles appear in the buffer at any moment and the speed slider the rate of change. The wavelength and speed sliders have no effect in manual mode.
Wave Modes:
- Manual
In this mode a waveform can be drawn onto the wave buffer and set to oscillate by switching on the physic toggle.
- SinCos
The wave buffer displays a sine or cosine waveform selected using the 'Sin Cos' toggle switch.
- Interlace
The wave buffer displays an interlaced sine or cosine wave. Each alternate step of the wave is swapped with the corresponding value from the end of the buffer. For example step 2 swaps with step 15 and step 4 with step 13. - Comb
A simple comb wave with alternate values of 0 and 1.
- Spiral
The buffer is filled with the spiral function - x²+y² = a²[arc tan (y/x)]²
This screen is the hub of the sequencer. From here you can adjust the range of the node activation areas, set which nodes are triggered, adjust manual waveforms, adjust note velocities and 'play' the node string directly.
 fig5 - Main Control, trigger page
When the node string is not being controlled by a wave buffer the sliders below the node surface control the physics effects of the surface and string.
First is a friction control, high values will make the nodes slow to a stop over time and low values will allow the nodes to move indefinitely.
The next slider controls the speed of the node movement, a high friction and low speed will make the nodes feel sluggish when moving them manually.
The third slider controls the rest distance between the nodes. Low values will attract the nodes to each other forming tight bundles. High values will make the nodes repel each other and move to the edge of the surface. The rest distance slider can be made to oscillate by pressing the toggle switch to the right.
Below the sliders are two sets of buttons. The first on the left controls the physics mode of the node surface. The physics modes are:
- no physics - nodes will remain where dragged
- mass spring - nodes will move according to the physics settings but are not attracted to each other nor can they cross each others vertical plane.
- super spring - nodes move according to physics and are attracted by an elastic string joining them.
- hold x - no change of horizontal position possible
- hold y - no change of vertical position possible
- grid on - surface divided into a 32x32 grid. nodes will align to the nearest grid point.
- 'snap' - nodes will distribute evenly along the X and Y axis (regardless of other grid settings)
The trigger grids shown in figure 5 determine if an active node can send a note (if assigned one). Each grid is an 8x4 array of squares, one for each node in the string. As the nodes move through the activation ranges the trigger grid for that node will light up. Selecting a grid square will highlight that square and play the note assigned to that node (if any) when it is activated. The grid squares will 'pulse' when a note is assigned to the node it represents.
Wave and Velocity Views
Also available from the main control screen are views of the wave buffers and the note velocity assignments. The wave buffers active and physic toggles can be controlled and the waveform edited if the wave buffer is in manual mode. The velocity levels can be changed and will be reflected on the main velocity control screen.


The EsoWave Sequencer by Rick Hawkins is licensed under a Creative Commons Attribution-Share Alike 3.0 Unported License.

